Archive by Author

Cigar Tip: Check Out The Cigar Clip

4 Jun 2014

Today I’d like to introduce you to a new cigar accessory that I found recently, which has really revolutionized my smoking experience. I was in the lounge the other day when our local Pinar del Rio representative made an unexpected stop-in. As an employee of the store (and since I’m known there for writing reviews) I was invited to sit in on the chat with our rep, and try some of the PDRs he was handing out. Side note: Those sticks were all winners, and I’ll be posting some info about them in the near future.

The Cigar Clip
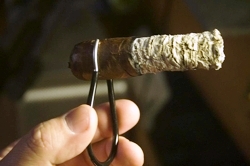
After we had smoked a few cigars, the rep let slip that he manufactures his own cigar accessories on the side. Of course, the owner and I were interested in trying them out, and a few minutes later I was using Joseph Gangemi’s The Cigar Clip, the tool that will be the focus of this article. It’s a really simple-looking accessory, but when I used it, it kind of blew my mind. The clip is rounded at the end, with a coating so it does not slip in your fingers, and then the ends create a pincer, almost like pliers or salad tongs.

The idea is this: Instead of using a nubbing tool that stabs into your cigar, this one wraps around it. That has a few benefits. First, you do not need to actually puncture the cigar and risk breaking it. Secondly, the clip fits around two fingers really comfortably, so you can hold it just like you would any other cigar you’re smoking. I found this really great for driving, as I can have both hands on the wheel, except for when I’m actually taking a puff. The clip adjusts for down to a 37 ring gauge, and up to a 60 easily, but it should be able to hold just about any cigar on the market. I was also worried that the cigar might slip out, but this was not a problem on any of the three that I’ve used this on.

Let’s talk about a few flaws really quickly. Since the prongs on the end of the Cigar Clip are metal, they can get a little hot when the cigar is really close down to the end, and if your lips touch them, you’ll notice. Now, they aren’t going to burn you, but it’s not exactly comfortable when this happens. Also, when I first received mine I needed to spend about three minutes working the metal. What I mean by this is making the adjustable portion less rigid, so that it can go down to the 37 and up to the 60.

Those are really my only complaints, and for the price (just $10), I can’t be too unhappy. I believe we’re going to start carrying this is in the store, and I think it’d be a fantastic gift to give any cigar smoker. I can tell you that I’ve already considered purchasing a few this Christmas to throw in the gifts I give to the cigar smokers I know. While nubbing is a nice feature of this accessory, and the main one, there are a few other uses Joe pointed out to me that I figured I’d throw in here. The driving one is a big plus for me, and the other feature is that if you’re doing an activity that might cause your hands to be dirty, you can use this to not have to touch the cigar (the example he gave was using this while fishing so that you can touch your bait and fish without having to worry about touching the smoke).

Overall, I was really impressed with Joe’s clip, and I’d recommend you all try to find one in a store near you to add to your accessory collection. If you can’t find a store, they can be ordered off of The Cigar Clip website. If you guys have any cigar tools you regularly use, or if you’ve used this one before, let me know in the comments.

Full disclosure: This accessory was given to me for free by the creator of The Cigar Clip as a sample. In no way does this affect my review, and I want you all to know I was completely honest in my opinion here.

Joey J

photo credit: The Cigar Clip

Commentary: On the Matter of Gender Inequality in the World of Cigars

28 May 2014

On most Friday nights my mom and stepdad attend karaoke at a nearby bar, the Mercantile Club. While most bars no longer allow smoking, this is a social club where one has to sign up for membership, so they are able to smoke cigars in the bar.

There are some general rules to follow while doing this. First, it is considered impolite to sit next to someone who is eating while smoking your cigar. Second, it is generally considered better to sit near the big vents (the “smoke eaters”), as opposed to further away from them. Both of these guidelines make a lot of sense to me.

What doesn’t make sense is the reaction my mother got on a recent Friday. During karaoke, my stepdad was trying a new Dominican blend, attempting to find something to replace a stick which he recently found out was a limited release, and my mom smoked some of the cigar as well, saying she enjoyed the flavor. While my stepdad was away, a man lectured her on the dangers of smoking cigars, and told her she was “too pretty to be doing that anyway.” Let me make clear that I have smoked cigars in the Mercantile Club a number of times—many times with that same man in the bar—and I have never received this lecture.

Maybe a second anecdote will show my point a little clearer. I was in a large cigar store a few weeks ago just hanging out, smoking, reading, and minding my own business. A man, who I’ve never met, let alone ever said anything to, just taps me on the shoulder, points at the TV, and says, “Hey, check out the tits of that brawd.” I ignored him.

Why is it that as soon as one enters a cigar shop, they feel they have a free pass to talk about women in an objectifying manner? Or to treat women cigar smokers differently? While this is not true for everyone, I have a lot of anecdotal evidence to suggest it is a prevalent problem. I noticed from working weekends at my cigar lounge that a lot of the older men think that our business is an “escape” for them from their wives, and this gives them an excuse to say anything they want.

Let’s get this straight: A cigar lounge is an environment for anyone, regardless of their gender, race, political affiliation, class, sexual identity, etc.

The fact that my mom had to ask me, “Is there something weird about me smoking a cigar?” disgusts me, and it should disgust anyone involved in this fine hobby. We’re better than this; cigar smokers are some of the best people around. And there is nothing about cigar smoking that makes it an exclusively “male” hobby. If a woman walks into a cigar shop, she should be treated just like anyone else: a customer. And we don’t need to assume, just based on gender, that she only likes mild cigars, or only smokes flavored cigars.

I won’t even get into the realm of borderline-sexist cigar advertisements (yes, we get it; a cigar is phallic in shape). I would just like cigar smokers to think about whether you would like to be coddled or objectified the next time you go to relax and enjoy a smoke.

As always, if any of you have similar stories to share, or thoughts on the matter, please let me know in the comments.

Joey J

photo credit: N/A

Commentary: Forming Cake in a Pipe

19 May 2014

First, I’d like to apologize for the lack of pipe content in the last couple weeks (you may recall my previous articles on why I smoke a pipe, tools of the trade, beginner pipe blends, and how to properly pack a pipe). I have been in a swamp of finals and term papers finishing up my first semester at graduate school, and I just have had no time to write anything about pipes, much less to smoke any. But, the semester is over, summer is here, and I’m back to smoking! So today we will talk about building cake in a pipe.

Pipe

So, first off, what is cake? Cake is the term for the carbon build-up left in a pipe after you smoke a bowl of tobacco. Cake is a good thing. You want a nice, even cake lining the bowl of your pipe. This will help keep the smoke cool, and it will also lend a particular flavor to your smoking, depending on what types of tobacco you’ve built that cake with.

A very important thing to remember from this definition is that we want cake to be even. If your pipe’s cake gets too thick, you can crack the pipe and permanently break it. So, anytime you think it might be getting too thick, take the scraping part of your pipe tool and just break it down. Exactly how much cake one wants is up to debate, but the general rule I’ve heard is about the thickness of a dime.

How does one build cake? There are a lot of tricks. Some will tell you to fill your pipe with honey or jelly so that the ash will stick to it, others will recommend plugging the pipe somehow, etc. All of these tricks have one thing in common: They are unproven, and risky. The only way to reliably build cake is to smoke your pipe, evenly, to the bottom of the bowl.

The method I use to break in a pipe takes quite a long time, but it’s a great way to do so, and it ensures you get a consistently even cake. All you’re going to do is pack about a quarter of your pipe and smoke it, all the way to the bottom of the bowl. If you cannot finish all the tobacco in one sitting, just place the pipe down and come back to it. After you’ve done maybe six or eight bowls at a quarter full, bump it up to a half bowl, and, again, smoke six or eight bowls. If you keep doing this, afterwards jumping to 3/4 of a bowl and then finally full bowls, you’ll experience a cool, sweet, broken-in pipe.

If you have any questions about how to build cake, if you have any tobaccos that you think perform particularly well for cake-building (I prefer a burly blend like Prince Albert), or if you have any other experiences or stories about breaking in a pipe, let me know.

Joey J

photo credit: Flickr

Commentary: Properly Packing a Pipe

21 Apr 2014

Following my articles on why I smoke a pipe, tools of the trade, and beginner pipe blends, today I tackle two very important topics: how to pack your pipe, and how to avoid the infamous “tongue burn.” Thankfully, there are simple solutions that will help you with both.

Pipe

To start, we’ll talk about packing a pipe. Now while tobacco comes in all different types of forms (ropes, flakes, plugs, coins, etc.), we are going to talk about those more difficult types in their own specific articles. For now, the first step for you to pack your pipe will be to make sure all of your tobacco looks ribbon/shag cut. This is a really easy process. Just pick up the tobacco you want to smoke, assuming it isn’t already ribbon cut, and rub it between your thumb and fingers. The harder you rub, the finer a product you’ll produce.

Once all of the tobacco is prepared, make sure it’s dry enough to smoke. For a general rule of thumb, tobacco right out of the tin (or out of a jar if you’re aging it) couldn’t be hurt to leave out on a paper plate for 30 minutes to an hour. What I normally do if I know I’m going to be smoking is to just pop the tin, leave it open for a few hours until the tobacco is nice and dry, and then seal it back up. The tobacco should not only feel dry to the touch, but it should feel room temperature.

If your tobacco feels dry but a little cool, there’s some moisture in it still. Smoking tobacco that’s too wet will make you draw on the pipe more, and this will produce a hotter flame (more oxygen). That hot flame is what burns your tongue. Also, smoking a really wet tobacco can produce “gurgle,” which is, for lack of a better term, spit and flavorings that accumulate at the bottom of your pipe, which you’ll then bubble up and smoke. To state the obvious, you do not want this to happen.

Now that your tobacco is dry, we’re going to use the three-step method for filling a pipe. It’s really simple, and surprisingly effective. Step one, pinch the tobacco in between your thumb and fingers and drizzle it into the pipe bowl until it’s full. Do not push it down, just fill the bowl. Once it’s full, press down lightly until the bowl is about 50% packed. Use a tamp or pipe nail to make this easier.

Step two, repeat the process, and push down a little firmer till the bowl is about 75% full. Step three, one more time, repeat the process, and push down till the tobacco is just under the rim of the bowl. After that, just apply flame and your pipe should be good to go.

When packed like this, you should be able to avoid tongue bite. The other ways tongue bite can occur are by packing too loosely, pulling more oxygen in, and stoking the flame when you draw on it—or by packing too tightly, causing you to draw too hard and, again, stoking the flame too high.

This is not the only way to pack, but it’ll get you off on the right foot. Like I said, I’ll cover a few ways to pack odder-shaped tobacco in the future, but if you’re dying for information now, there are a lot of good videos out there. Let me know if this method works for you in the comments. Next time we’ll discuss cake: what it is, how to get it, and some fun myths about it. For now, I’ll leave you with a pro tip: If you must smoke some pipe tobacco now but it’s too moist, put it on top of your computer or cable box for about five minutes on a paper towel/plate. It’s like microwaving tobacco!

Joey J

photo credit: Flickr

Commentary: Beginner Pipe Blends

10 Apr 2014

Hopefully, after my previous discussion on the different types of tobacco pipes, you were inspired to go pick one up. Now you’re probably realizing you need some tobacco. Well, today I’m going to discuss different types of tobaccos and some good beginner blends.

A quick disclaimer: This article is going to paint in very broad strokes. There are tons of different tobacco “genres,” but I’m going to focus here on the Big Three. This is not to say that they have more merit than the others, or that there is something inherently more important about them. They are simply the most common. Also, the blends that I recommend will be from my personal experience and opinion. If you don’t like them, or if you have another idea, please feel free to discuss it in the comments. Just know I am not trying to say these are the “best” blends; what I am saying is they are good, beginner-friendly representations of the larger groups they come from.

Virginia Tobaccos — Virginias are some of the most common tobaccos. If a blend is not pure Virginia, then it likely has some Virginia leaf in it. What’s great about Virginias is they come in all different shades. Mainly, there are “bright” and “matured” varieties. The difference here is in color and flavor. Bright Virginias are yellows and light brown, and taste sweet, with notes of hay and citrus very common. Matured, dark Virginias have a higher nicotine content and a much richer flavor (full palate sweetness, dark earthiness). There are also reddish Virginias, which seem to be a good in-between. Virginias tend to come in the flake format, or broken flake, which is a bit harder to prepare to smoke, so I’d recommend watching some videos on that before you attempt it (this is a topic we will cover later). For a lighter blend, I’d heartily recommend Orlik’s Golden Sliced, which has great lemon and citrus notes. For a darker version, try H.H. Matured Virginia from MacBaren.

English Tobaccos — This definition is a constant topic of debate, but used colloquially English blends refer to blends which feature latakia. Latakia is a leaf similar to fire-cured (for more info, see my review of the A.J. Fernandez Spectre), and tastes smoky and spicy. These are great tobaccos, but I would recommend you start with a tin containing only a slight amount of lat, to make sure you like it. Luckily, there’s a fantastic series of pipe tobacco which is just that: McClelland’s Frog Morton. Specifically, I’d recommend either the titular “Frog Morton” or “Frog Morton Across the Pond.” Across the Pond is a bit more intense, but still shouldn’t scare anyone away.

Aromatics — Much like flavored cigars, these are blends with something added to them. These are the pipe tobaccos most people associate with their grandfathers (if you ever want to figure out what your grandfather smoked, I’d bet money it was Middleton’s Cherry, which you can still find at drugstores today). Some aromatics are very goopy. What I mean is there’s a lot of flavoring added and they smoke very wet. Also, aromatics tend to “ghost” briar pipes (they leave their flavor in the pipe itself). Due to this, I only smoke aromatics in a corn cob. My favorite aromatics are currently Drew Estate’s Central Park Stroll, which has chocolate and fruit notes, and MacBaren’s Honey & Chocolate, which is the most chocolatey blend I’ve ever tasted (the honey, however, I don’t get).

These should be very accessible blends that will help you get into pipe smoking. If you try any of these, or if you’d like to hear reviews of them, or if you have other suggestions, let me know. Next time I’ll cover packing a pipe and avoiding tongue burn.

Joey J

photo credit: N/A

Cigar Review: Drew Estate Nirvana Toro

2 Apr 2014

When I first saw the Nirvana on the shelves of the tobacconist near me, I was confused. I hadn’t heard anything about these cigars up until I saw them, and as someone who is very active on tobacco blogs (not to mention someone who works somewhat in the industry), that’s pretty rare for me. So, imagine my delight when I stumbled upon a beautiful new Cameroon smoke from Drew Estate with absolutely no warning.

NirvanaThis cigar is truly beautiful, too. The Cameroon wrapper is a really nice shade of reddish-brown, with a light tint, and the gold bands on the cigar make it stand out. I really like Cameroon wrappers. In fact, I think they’re underused, but I understand that some find them too delicate. If you’re one of those smokers, you should still be excited about the Nirvana, which is made by Drew Estate exclusively for Royal Gold Cigars (the premium cigar division of Swisher International, Inc.). Drew Estate has stated that their intention with this blend is to match the sweet earthy complexities of a Cameroon smoke with the strength, boldness, and spice of the Nicaraguan fillers. On top of this, the cigar has some Honduras filler with a Mexican San Andreas binder.

I clipped the cigar and it lit very easily with a single-flame torch. The first thing I noticed was the amount of smoke. Similar to the Undercrown or T52, the smoke off this cigar is like a small signal fire. Well, maybe not that bad, but I was the only one smoking in our twelve-person lounge when I lit up, and I needed to turn on the exhaust system. This smoke is not harsh or heavy, though, it’s very smooth and pleasant. I wouldn’t quite call it creamy, but it’s close.

About an inch into the cigar that typical Cameroon sweetness came in, with notes of earth and coffee in the background. All of these were complimented by a very long, enjoyable, spicy finish. The flavors on this are hard to pin down, because there are so many, but these are the main ones. As the cigar continues the spice dies down and the Cameroon flavors become stronger and more pronounced. Throughout all of it, though, the cigar maintains a perfect balance—as one flavor moves forward, others fade to the background to allow specific points to have their spotlight.

This cigar is easily my favorite smoke I’ve enjoyed in 2014. There is something to love here for everyone. While the cigar is a bit more expensive than average, weighing in about $10, it is absolutely worth it. Seek this smoke out if you can. With that being said, I’m going to have to award it a four and a half stogies out of five.

[To read more StogieGuys.com cigar reviews, please click here.]

Joey J

photo credit: Stogie Guys

Commentary: Tools of the Trade for Pipe Smoking

26 Mar 2014

In my first article of this series on pipes, I tried to provide some reasons for the typical cigar smoker to consider smoking a pipe. Hopefully those were effective, and now you are looking for some advice on what you physically need to get into the pipe-smoking hobby. Well, look no further. Today we’ll discuss the three main materials that pipes are made of.

Tobacco Pipes

Pipes can range in price drastically, from $5 to over $1,000. They come in all different shapes and sizes, with tons of different designs. These differences do impact the smoke to some degree. The larger the bowl size, for instance, the easier you can pack certain tobaccos. If the stem of the pipe is long, this will cool the smoke as it goes from the lit tobacco to your mouth. The shape of the bowl itself can impact the taste, with some people preferring different shapes for different blends.

However, all of this is personal preference. The most important thing about the type of pipe you get will be how it looks and feels to you. If you have the option of going to a local tobacconist with a nice pipe selection, pick them up and find one that feels right. If you’ll be using an internet retailer, shop around a lot, look at all the different options, and find one you really like. Pipes will last a long, long time if you treat them right, so make sure you like the one you end up with.

This brings up our next point: whether you should buy a corn cob pipe, a briar pipe, or a meerschaum. There are some pros and cons to each. Corn cob pipes are the cheapest way to get into the hobby, and so that is probably the best option for someone who is unsure about pipe smoking. However, they also can give tobaccos a different flavoring (you taste the corn cob). Also, these pipes are normally filtered, have small bowls, and do not develop any sort of cake (the “breaking in” carbon build-up that occurs in briar pipes).

Briar is the most common type of pipe material, and you’ll find thousands of options in this format. This is the way that I personally started smoking pipes, but it is certainly more expensive than a corn cob. The biggest advantage to a briar pipe is that it builds cake. This is something we’ll discuss more in-depth in the future but, to put it simply, cake has three main functions: it keeps the pipe cooler as you smoke it, it keeps the pipe strong on the inside, and it develops a particular, unique flavor based on the types of tobacco you smoke in that pipe. For example, if you smoked all Virginia-based pipe tobaccos in a pipe, it would begin to taste like those tobaccos, and make the flavors in those tobaccos more intense. A good way to start smoking a briar pipe is to pick up a Dr. Grabow, which can be found pretty cheaply in most pharmacies and tobacconists.

Finally, there are meerschaum pipes. These pipes are carved out of a clay-like material, and normally feature very intricate, creative patterns. They can look like animals, people, dragon claws, etc. Meerschaum is all white, and as you smoke it the pipe will very slowly begin to develop a yellow-brown tinge, which does nothing to the flavor but looks really beautiful. I would not recommend a meer to a beginning smoker, as they are expensive and you need to watch to make sure you aren’t building cake in them, since it can break the pipe.

Whatever you choose, find a pipe that looks right to you. You probably want to stick with a corn cob or a briar pipe to start, and don’t feel pressured to spend a lot of money. Then, all you need is a “pipe tool” (anywhere that sells pipes should have these, they let you tamp down the tobacco in your bowl), a lighter, and some tobacco. Feel free to try any tobaccos that smell good, or that your friends like. In my next post, I’ll break down the different types of pipe tobaccos, and I’ll recommend some good beginner blends.

Joey J

photo credit: Flickr